Knitting Baby Stuff: Rainbows & Meadows

I’ll start by putting it out there. I could have done better. And if I didn’t have a ‘to knit’ list as long as my arm and several fast approaching deadlines (also known as due dates), I probably would have frogged this and re-knit it. But here we are and it is the way it is. I’m hoping it still finds a very happy home.

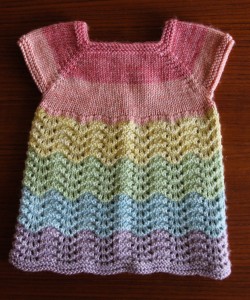
My gorgeous rainbow mini skeins from Gradient have been realised this sweet little dress.

IMG_6785

Rainbows & Meadows.

Pattern: Meadow Sweet Baby Dress by Marianna Mel

Source: Ravelry download

Price: Free!

Yarn: Rainbow Mini Skeins in 8ply from Gradient Aus (used ~120g)

Screen Shot 2015-06-07 at 10.01.00 am

Needle: 4mm (I knit on circulars as you end up with 164 stitches at one point)

IMG_6791

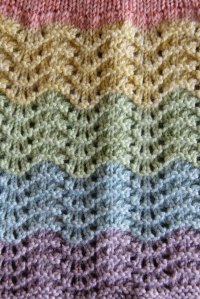
Not happy with my colour change timing. The skirt starts visual on the increase row but I didn’t change colour until the start of the 4 row lace repeat.

The main reason for contemplation of frogging here was the way I divided the colours. I used a new colour every 17 rows on the bodice and every 4 repeats (16 rows) on the skirt. Given my time (and yarn) again, I would use one colour for the whole bodice, change to the first skirt colour for the increase row (row 33) and change colour every 3 or 4 repeats for the skirt. The change in colour mid-bodice looks strange and the skirt starts visually on the increase row but I didn’t change to a new colour until the start of the lace repeat resulting in a slightly awkward look.

The pattern calls for the first stitch of most rows to be slipped, which I did purl-wise—an inspiration from my Pekapeka knits—giving a very neat vertical edge. I also used markers during the bodice to help me knit the raglan sleeves without having to concentrate too much on my counting.

IMG_6787

Gorgeous rainbow cascade.

I’ve also been exploring the world of the ‘loose cast-off’. Patterns often call for this and I’m never quite sure I’m achieving it. So a quick Google sent me here where I found two techniques for ensuring a loose bind off. I used the ‘yarn-over’ method for this project as the skirt is ruffly and a super loose cast-off helped it show off its ruffles! The description of this technique puzzled me slightly in terms of how to get started.

I knit the first stitch, then did a yarn over and knit the second stitch. I then passed the yarn over loop over the second knit stitch and then passed the first stitch over the second stitch. Then did a yarn over and knit the next stitch. I continued in this way always putting the yarn over loop over first. Is that a better explanation?!

The other new thing for me with this knit and my Little Boy Blue was trying a different (gentler) technique for blocking. I recently bought some blocking mats from Knit Picks so after years of spreading beach towels over guest beds and then poking holes in them with my sewing pins—much to my husband’s dismay—I was able to neatly lay things out on my purpose built mats. The box came with instructions on how to block and I was rather surprised to see I’ve been doing it wrong!

I have always drenched my knit in warm water, often giving it a good few squeezes to get the water into the knit, then squeezing it again to get most of the water out. I think this has been beating my knits up a bit. I did notice recently that one of my Composite cardigans, done in a delicate silk blend yarn looked considerably more fuzzy and little worse for wear after blocking. The results with this new technique were much nicer!

The Knit Picks instructions are as follows (paraphrased for brevity):

  1. Soak knit in basin of lukewarm water until completely wet (usually at least 30 minutes). Very gently squeeze out any air bubbles.
  2. Remove from basin and put into sink to drain. Avoid wringing or twisting. Once most of the water is out, gently press knit between two towels to remove additional water.
  3. Carefully lay project out onto blocking mats away from direct sunlight or any heating vents. Shape according to pattern and use pins to secure project in place.
  4. Allow to air dry before removing pins.

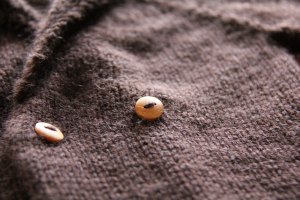
Now to find some suitably gorgeous and girly buttons for the back!

Knitting Baby Stuff: Playing Pick-up Sticks

In my current knitting frenzy, I found myself mid-way through a couple of projects and lacking the double-pointed needles (DPNs) required to finish them off. So these two little knits for boys sat idle for a little while as I waited for a delivery of DPNs from Loveknitting.com. But now, after much playing of pick-up sticks, they are blocked and ready to go to their new homes!

Screen Shot 2015-06-07 at 11.02.32 am

Is it just me, or does knitting with DPNs always feel like a slightly strange game of pick-up sticks?

Screen Shot 2015-06-07 at 11.04.55 am

The original version. Photo from (and instructions on how to play) here.

***

IMG_6778

‘Little Boy Blue’ – my version of Elizabeth Smith’s Little Coffee Bean. Delicious, thick and soft.

Pattern: Little Coffee Bean by Elizabeth Smith

Source: Ravelry download

Price: Free!!

Yarn: Debbie Bliss Cashmerino Aran (55% wool, 33% acrylic, 12% cashmere) in two shades of blue.

Needles: 5mm circular & DPNs; 4.5mm circular & DPNs

This knit is for a little boy whose mother is in my Facebook mothers’ group. We’re doing a birthday present swap and I’m hoping this will fit him perfectly for this winter as he turns one in a few weeks. I knit the 12 month size and it’s gorgeous! The yarn was bought to make a big romper suit for W, but I realised it would be a lot of work and he was probably unlikely to wear a thick knitted romper suit more than a few times making it hardly worth it. I’m hoping this little cardigan gets a bit more use!

IMG_6779

Perfectly aligned button band thanks to very clear instructions on how to pick up stitches along the edge.

The pattern for this is very well written and I didn’t have any trouble following the instructions. Elizabeth Smith even specified how many stitches to pick up per row for the button band! I love this!

I find instructions like “pick-up 124 stitches evenly along the edge” slightly overwhelming, so: “Pick up and k 3 sts for every 4 rws (pick up and k 3 st, skip 1 st, pick up and k 3 sts, skip 1 st, etc) along garment edge down to hem, making sure total number of st picked up is divisible by 4 + 2. Write this number down.” …is BRILLIANT! Very, very hard to go wrong. And having followed her instructions, my number of picked up stitches was 58. Perfect.

I used a stretchy cast-off to make sure that the sleeves were easy to pull over wriggly little arms. I found instructions here. Essentially, it is done by k2tog, slipping the resulting stitch back onto the left hand needle and then k2tog again, slipping resulting stitch back onto left hand needle, etc. It made the edge so loose that it looked like it was going to flick out a bit but a good blocking sorted that out.

***

IMG_6773

Henry’s Sweater. Not for a Henry.

Pattern: Henry’s Sweater by Sara Elizabeth Kellner

Source: Ravelry download

Price: Free.

Yarn: Debbie Bliss Cashmerino Aran in chocolate brown

Needle: 3.75mm circular & DPNs

This little coat just looked too cute to pass on when I saw it here, but I didn’t note the changes that had been made to the original pattern, so had to face issues of edge curl and the slightly less gorgeous cuffs. Ah well.

I’m not as thrilled with this as I’d like to be, and it seems rather huge for 3-6 months. I’m increasingly suspicious that I’m a loose knitter as a lot of my baby knits end up a good deal larger (and using more yarn) that expected. Maybe it’s time to (finally) start doing gauge swatches. Sigh.

This pattern was reasonably easy to follow—though I did find the instructions to insert sleeve decreases after given lengths (e.g. “insert a decrease row after 2, 4 & 5½ inches”) a little imprecise, so opted to calculate row counts based on the gauge of my knitting on the jacket (i.e. decrease at row 15, 30 & 43). This allowed me to ensure the decrease rows were inserted symmetrically on both sleeves. Virgo moment.

IMG_6768

Knitting 10ply on 3.75mm needles gives a very tight, almost felty, stiffness to this knit.

Given my time again, I’d opt for a silkier yarn. I’m not sure if it was the batch, but I found this yarn to be considerably less scrumptious than the one I used for the blue cardigan despite them being the same brand and blend. This was noticable even just as I knit, so the difference isn’t completely down to the much tighter gauge. I’d also add the ribbed sleeves as in the version I fell in love with. Not sure how to do an i-cord edge which can be used to prevent edge curl. A skill to be acquired, methinks!

IMG_6775

Ready to roll.

Now to parcel it up and send it off to a new little man who arrived just slightly before the DPNs did. I’m hoping he’ll love this little coat made for him. Even though he’s not named Henry.